Recipe Review: Cauli-power Fettuccine “Alfredo”

As I breifly mentioned in my last post, I’ve made some changes to my diet, which include lowering my daily fat intake. So, when I saw Angela’s recipe for alfredo sauce made with cauliflower come through my in-box, I was all about it!

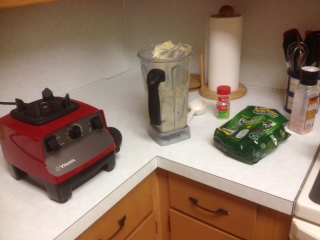
As luck would have it, Whole Foods had organic cauliflower on sale, so I picked up a couple of heads and Cauli-power Fettuccine Alfredo was moved to the top of the dinner menu.

photo 4(2)

I’ve been using corn pasta, or a combo of corn and some other gluten-free grains, and I’ve been pretty happy with the outcome. The taste is good; the texture is good, and I don’t feel all vibratey after eating a big ol’ bowl of pasta like I do when I eat regular semolina pasta. So, for this recipe, I used the pasta I had in the pantry, which was a bag of rigatoncini. I figured that shape and style would work fine with this sauce because of the lines – and I was right. Woot!

photo 2(3)photo 1(4)


I was a little worried the sauce would come out watery because of my previous attempts at using cauliflower in sauces and soups. (Hello. How do people think mashed cauliflower tastes anything like my beloved mashed potatoes?!) But, surprise surprise, the sauce was super thick and creamy and delicious!

photo 3(3)

I ended up adding a little extra nutritional yeast (because I always do), and I waited to add any salt until the individual servings. (I’m making a conscious effort to reduce my sodium intake.) I also skipped the sauteed onions (If you keep them in, please try sauteing them with water, not oil.) and just added granulated garlic and onion powder to the mix. And, I had plain soy milk open already, so I used that for the non-dairy milk. I think using a thicker non-dairy milk like soy or hemp is probably a good idea, although Angela used almond milk.

photo 3(2)

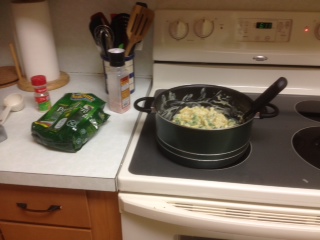
I also added some broccoli to my dish. I just tossed in w/ the pasta as it cooked, and eight minutes later, they were both done. Yummy add for no extra work! (Well, except for the little bit of chopping required to get the broccoli florettes off their stems.)

photo 1(3)

Other than those few tweaks, I followed the recipe exactly. I even  followed the suggested order of boiling the cauliflower first then making the sauce and letting it sit while I boiled the pasta and broccoli. After I drained the pasta/broccoli mix, I added it back to the hot pan on the still warm burner and poured in the sauce, stirred, and ate!

photo 2(2)

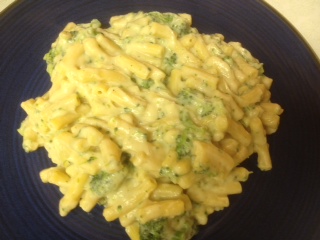
I will definitely make this recipe again! One thing I will keep in mind, though, is the sauce really soaks into the pasta as it sits, so the next day, the pasta is a bit mushy, and the sauce is even more bland. I ground on a bit more salt and plowed through my next-day plate, but I kept wishing I’d added some fresh tomatoes or onions or something to brighten it up. (My husband thought adding a little bit of non-dairy milk might help revive things a bit, but I’d already eaten all of the left-overs before he suggested it. Ha!)


Oatmeal Raisin Cookies – Overt Fat Free

I need to write a post about the current state of my diet, but long story short, I’ve gotten a handle on my moving + holiday eating frenzy and feel like I’m in a good place right now. Basically, I’m eating within a ration of 80% carbohydrates and 10% each fat and protein. And while my diet is high raw, it is not all raw, so it’s not the 80-10-10 of The 80-10-10 Diet – just the ratio.

Back to why we’re here today…I made cookies!

photo 5

Yup. Delicious, nutritious, overt-fat-free Oatmeal Raisin Cookies made with only four ingredients (five if you count the optional cinnamon) and sweetened only with fruit. 80-10-10 for the win!

photo 3(1)

Oatmeal Raisin Cookies (Overt Fat Free)

2 c old fashioned oats

1/2 c super thick date paste

1 medium banana, mashed (about 1/4 c)

1/4-1/2 c raisins (soaked if dry)

1 tsp cinnamon (optional)

First, make date paste by blending soaked dates. Try not to use any of the date soaking water, so the paste is extra thick and sticky. Then, mash the banana using a fork (or pulse it in a mini-chopper). Don’t blend it because the liquid banana will add liquid to the dough.

Add oats and cinnamon to a bowl. Stir to combine. (Optional: Add a dash of salt.) Add mashed banana and date paste. Stir to combine. Add raisins. Stir to incorporate. [If  dough is too dry, add more date paste.]

Scoop dough onto a parchment or Paraflexx lined dehydrator tray. [I used an ice cream scooper.] Use the back of a spoon to flatter the cookies into desired thickness. Shape edges for prettier cookies (and so no little bits dry and fall off).

Dehydrate at 145F for about 30 minutes to quick set the cookies. Reduce heat and continue to dry at 110F for about 60 minutes. Flip cookies and continue to dry for 60-90 more minutes.

Makes 10 cookies at about 160 calories and 1.5 grams of fat each.

NOTES:

EFA’s: If your diet is a little low on EFA’s (essential fatty acids 3-6-9), try adding a flax “egg” (1 TBSP flax meal + 1-2 TBSP water). You might need to cut back on the date paste if you.

Baking: If you don’t have a dehydrator or don’t feel like using one, you can try baking the cookies. Try a low oven of around 200F and check on the cookies every 5 minutes. I’m guessing it will take somewhere between 5-10 minutes to dry out the cookies. (Be careful; without fat, these cookies will go from not-quite-done to burnt in the blink of an eye.)

Storage: Completely cool the cookies and store in an air tight container. You can probably store these outside of the frig, but I like to keep all of my goodies in the frig. [Remember, glass will help keep baked goods crispy, and plastic will help keep them soft. So, store according to texture preference.]

photo 2(1)photo 1(2)

photo 1(1)


photo 2

photo 4(1)

************************************************

Join the and get more Veggie V here…

Follow Veggie V on Facebook!

Follow Veggie V on Twitter!

Follow Veggie V on Pinterest!

Follow Veggie V on Instagram!

Join the Raw Fusion Rest here!